
Writing Haskell native GUI Applications with Threepenny GUI and Electron
![]()
![]()
tl;dr
Threepenny is an awesome Haskell library for creating browser based applications running on localhost.
By combining it with the Electron.js framework you have a great toolset for writing cross-platform standalone GUI applications — completely in Haskell with a great functional reactive programming API.
See it in action:
git clone https://github.com/thma/ThreepennyElectron.git
cd ThreepennyElectron
stack init
npm install
npm start
Prerequisites: - Git - Haskell Stack - Nodejs
Immature support for writing Desktop Applications in Haskell ?
Since reading The GUI chapter in Real World Haskell I had the impression that Haskell does not excel in GUI programming. The GUI examples in Real World Haskell are based on gtk2hs. Gtk2hs is a Haskell library that allows to write platform-independent GUI applications based on the GTK library. There are some large applications based on gtk2hs or its successor gi-gtk-hs like the Haskell IDE Leksah. It’s rock solid technology. But it’s also quite dated and the imperative programming model is not an ideal fit for a purely functional language like Haskell.
So even though I’m a Haskell enthusiast I tended to agree with Gabriel Gonzales “Immature” rating of Haskell’s support for standalone GUI Applications.
Threepenny to the rescue
A few weeks back I was asked to write a standalone GUI version of an existing Haskell commandline app. So I had to make up my mind about choosing a GUI library with an optimal fit to my needs:
- provide a multi-platform (Windows, MacOS, Linux) standalone GUI application.
- use functional reactive programming instead of event handler callbacks
- provide a modern look and feel e.g. material design
I never was satisfied with the look and feel of GTK based applications. And I also wasn’t keen on going back to callback based UI programming. So I had a look at Gabriel Gonzalez great resource State of the Haskell ecosystem.
In the section on Standalone GUI applications he mainly mentions GTK and Qt bindings but also some other libraries. One of them is Threepenny GUI which caught my attention because it uses the web browser as a display. And it comes with an (optional) functional reactive programming model!
A program written with Threepenny is essentially a small web server that displays the user interface as a web page to any browser that connects to it. You can freely manipulate the HTML DOM and handle JavaScript events from your Haskell code.
(Quoted from the hackage documentation)
My next thought was: It would be cool to use Electron to host the Threepenny HTML/Javascript frontend against the Threepenny Haskell backend. By making use of the electron packager this would allow to package platform specific standalone GUI application for Windows, MacOS and Linux.
I really got excited when I found out that Jeremy Barisch-Rooney already had already written a short HOWTO document that explains the required steps to glue an ELectron frontend to a Threepenny backend.
Based on this Howto I was able to deliver a native windows GUI Application with an embed Haskell backend within just a few days. I received very good feedback from the endusers and my impression was:
“Thanks to Threepenny GUI support in Haskell has just become a bit more mature!”
As I did not find much coverage of this specific Electron / Threepenny GUI combination in blogs or tutorials I thought it would be a good idea to spread the word by writing a short tutorial featuring the basic building blocks of this approach.
So without further ado let’s get started:
Writing a platform independent standalone calculator app
In order to provide a bit more than just a hello world example I’m showcasing a simple pocket calculator app. This allows to demonstrate basic features of writing real world UI applications. The calculator is based on an earlier Threepenny GUI demo by Aleksey Pirogov.
The UI of the calculator is shown in the screenshot below. It features a display, a numeric block for entering digits and a decimal point, buttons for the four basic arithmetical operations, a clear button and a clear error button:
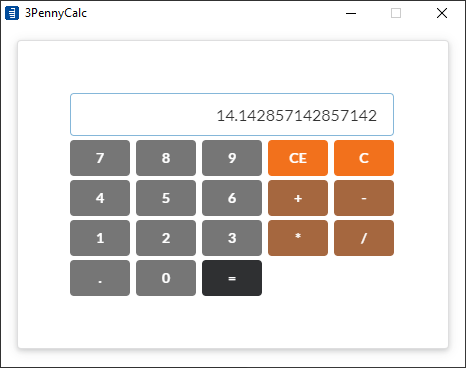
The calculator
At the heart of an application sits the model. In this case the calculator. It is implemented as a simple state machine. The state machine knows five different states:
- Entering a number into the first register A
- Finishing the entry of the first number by entering an Operation (+, -, *, /)
- Entering a number into the second register B
- Finishing the Operation of the second number by entering = or another arithmetic operation
- an Error state in case of divison by zero or by entering a wrong sequence of buttons
This is reflected in the following data type declaration:
-- | a data type representing all possible states of the calculator
data State = EnteringA     Entering                   -- ^ entering register A
           | EnteredAandOp Double  Operation          -- ^ A, Op
           | EnteringB     Double  Operation Entering -- ^ A, Op, entering register B
           | Calculated    Double  Operation Double   -- ^ A, Op, B
           | Error         Double  String             -- ^ A, Message
           deriving (Show, Eq)

-- | Entering is a tuple used while entering numbers. It consists of
type Entering = (String, Bool) -- A tuple of the String representation of the entered digits
                               -- and a flag signalling that Dot was already pressed.
Starting with an initial state
initialState :: State
initialState = EnteringA ("0", False)
we can operate the calculator by populating it with Button events:
-- in GHCi:
> populate "9" initialState
EnteringA ("09",False)
> populate "9" it
EnteringA ("099",False)
> populate "/" it
EnteredAandOp 99.0 Div
> populate "7" it
EnteringB 99.0 Div ("7",False)
> populate "=" it
Calculated 14.142857142857142 Div 7.0
The populate function is defined as :
populate :: String -> State -> State
populate = processCommand . parseInput

-- | process a calculator command. That is: compute a calculator state transition
processCommand :: Command -> State -> State
processCommand cmd = case cmd of
  Digit x      -> addDigit x
  Dot          -> addDot
  Operation op -> applyOp op
  command      -> applyCmd command

-- | parse a Command from an input string
parseInput :: String -> Command
parseInput x = case x of
  "0"  -> Digit Zero
  "1"  -> Digit One
  "2"  -> Digit Two
  "3"  -> Digit Three
  "4"  -> Digit Four
  "5"  -> Digit Five
  "6"  -> Digit Six
  "7"  -> Digit Seven
  "8"  -> Digit Eight
  "9"  -> Digit Nine
  "."  -> Dot
  "+"  -> Operation Add
  "-"  -> Operation Sub
  "*"  -> Operation Mul
  "/"  -> Operation Div
  "="  -> Flush
  "C"  -> Clear
  "CE" -> ClearError
  _    -> undefined
First the input is parsed to a Command. Based on the parsed Command
(either a digit, a dot, an arithmetic operation or =, C or CE) the current state is modified
by one of the functions addDigit, addDot, applyOp or applyCmd.
I won’t dive deeper into those functions, as you will easily grasp the mechanism by studying the source code.
The Threepenny GUI
I will not give an introduction to the Threepenny GUI programming model here as Threepenny already ships with plenty of samples and a good getting started tutorial. Instead I will focus on presenting only those parts that are necessary to understand the calculator GUI.
The application Main module consists of a single function main. It reads a port number from the commandline an then call Ui.start to launch a WebServer hosting the Ui application on that port:
main :: IO ()
main = do
  [port] <- getArgs
  Ui.start (read port)
This function will either be called when starting the application with stack exec ThreepennyElectron 8080 or by the electron launch script main.js (which we will discuss later).
The Ui module contains all code for rendering the HTML dom, setting up the event binding to GUI widgets and the respective interaction with application backend.
Let’s start with the main entry point Ui.start which is called on application launch:
start :: Int -> IO ()
start port = startGUI defaultConfig
    { jsPort   = Just port
    , jsStatic = Just "static"
    } setup
It takes the port number as parameter and starts up a web server with the Threepenny startGUI function.
startGUI has the folloing type signature:
-- | Start server for GUI sessions.
startGUI
    :: Config               -- ^ Server configuration.
    -> (Window -> UI ())    -- ^ Action to run whenever a client browser connects.
    -> IO ()
We build our server configuration by starting with the default configuration defaultConfig and
then modifying two properties:
- setting the port number to the one read from the command line.
- declaring the static content (i.e any html, JavaScript and CSS content) to reside in the directory
./static.
The (Window -> UI ()) action parameter is filled with the function setup.
Obviously this function must have the following signature:
-- | setup window layout and event handling
setup :: Window -> UI ()
As this function defines the whole layout and user interaction we will inspect it step by step.
Creating the Threepenny UI design
The first step is to define the UI elements the overall window layout:
setup win = void $ do
  -- define page + stylesheet
  return win # set title "3PennyCalc"
  UI.addStyleSheet win "semantic.css"
We start by assigning a title to the window win and adding a stylesheet. In our example we are using the Semantic UI stylesheet. (You could of course use any other css framework or roll your own.)
Next we define the calculator display element outputBox as a UI.input element. These elements willbe rendered as HTML DOM elements in the browser. Threepenny provides combinators to define css classes and other html attributes. In this case we set the input field to readonly, make the text align to the right and set its width:
  -- define UI controls
  outputBox <- UI.input
                # set (attr "readonly") "true"
                # set (attr "style") "text-align: right; min-width: 324px"
This is resulting HTML DOM element:
<input readonly="readonly" style="text-align: right; min-width: 324px">In the next step we define the calculator buttons for digits, operations and commands:
  -- define the button grid
  buttons   <- mapM (mapM mkButton) buttonLabels

  where
    mkButton :: (Command, Color) -> UI Element
    mkButton (cmd, clr) =
      let btnLabel = lbl cmd -- get the button text
      in  UI.button #. ("ui " ++ color clr ++ " button")
                    # set text btnLabel # set value btnLabel
                    # set (attr "type")  "button"
                    # set (attr "style") "min-width: 60px"

    color :: Color -> String
    color = map toLower . show

    buttonDefinitions :: [[(Command, Color)]]
    buttonDefinitions =
      [ [(Digit Seven, Grey), (Digit Eight, Grey), (Digit Nine,  Grey), (ClearError,   Orange), (Clear,        Orange)]
      , [(Digit Four,  Grey), (Digit Five,  Grey), (Digit Six,   Grey), (Operation Add, Brown), (Operation Sub, Brown)]
      , [(Digit One,   Grey), (Digit Two,   Grey), (Digit Three, Grey), (Operation Mul, Brown), (Operation Div, Brown)]
      , [(Dot,  Grey),        (Digit Zero,  Grey), (Flush, Black)] ]

-- | Button colors
data Color = Grey | Orange | Brown | Black deriving (Show)
To understand this piece of code let’s start with buttonDefinitions :: [[(Command, Color)]]: a list of lists of (Command, Color) tuples.
The outer list represents the rows, the inner list the columns in each row.
The tuples represent the button commands and colors we want to see on the calculator buttons.
Mapping the function mkButton over the buttonDefinitions is then used to create the buttons :: [[UI Element]].
Where mkButton defines each button as a UI.button, assigns a semantic.ui css class ("ui " ++ color c ++ " button")
to it (using the #. combinator) and sets text and other attributes by using the # set combinator.
To give an example the first element from buttonDefinitions: (Digit Seven, Grey) will be rendered in the HTML DOM as:
<button class="ui grey button" value="7" type="button" style="min-width: 60px">7</button>As the last step of the layouting stage we glue everything together to a nice grid and place it as the HTML body into the DOM tree. Again we use css classes from the Semantic UI framework to create a pleasant look and feel:
  UI.getBody win # set (attr "style") "overflow: hidden" #+
    [ UI.div #. "ui raised very padded text container segment" #+
      [UI.table #+ [UI.row [UI.div #. "ui input" #+ [element outputBox]]] #+
                    map (UI.row . map element) buttons]
    ]
The resulting HTML looks like follows (for brevity I’m showing only everything up to the first row of buttons):
<body style="overflow: hidden">
<noscript>Please enable JavaScript.</noscript>

<div class="ui raised very padded text container segment">
    <table>
        <div class="table">
            <div class="table-row">
                <div class="table-cell">
                    <div class="ui input"><input readonly="readonly" style="text-align: right; min-width: 324px">
                    </div>
                </div>
            </div>
        </div>
        <div class="table">
            <div class="table-row">
                <div class="table-cell">
                    <button class="ui grey button" value="7" type="button" style="min-width: 60px">7</button>
                </div>
                <div class="table-cell">
                    <button class="ui grey button" value="8" type="button" style="min-width: 60px">8</button>
                </div>
                <div class="table-cell">
                    <button class="ui grey button" value="9" type="button" style="min-width: 60px">9</button>
                </div>
                <div class="table-cell">
                    <button class="ui orange button" value="CE" type="button" style="min-width: 60px">CE</button>
                </div>
                <div class="table-cell">
                    <button class="ui orange button" value="C" type="button" style="min-width: 60px">C</button>
                </div>
            </div>
        </div>

        ...

    </table>
</div>
</body>
This was everything we need to create the HTML UI as shown in the screenshot above.
Defining the application behaviour
Now we come to the interesting part of UI interaction. Threepenny comes with support for functional reactive programming based on the concepts of reactive banana, a cool FRP framework by Heinrich Apfelmus.
So I promise we will not see any old-school event-handling in the following code:
  let
      -- map buttons to Command. (buttonMap :: [(Element, Command)] )
      buttonMap = zip (concat buttons) (concatMap (map fst) buttonDefinitions)
      -- register mouse click events to all buttons. (clicks :: Event Command )
      clicks  = buttonClicks buttonMap
      -- use (processCommand :: Command -> State -> State) to build a function that computes a
      -- calculator state transition (commands :: Event (State -> State))
      commands  = fmap processCommand clicks

  -- calculate behaviour by accumulating all commands, starting with the initial state
  calcBehaviour <- accumB initialState commands
  -- use Calc.toString to extract the display string from the calculator state
  let outText  = fmap toString calcBehaviour
  -- write outText to the outputBox UI element
  element outputBox # sink value outText
  where
    buttonClicks :: [(Element, Command)] -> Event Command
    buttonClicks = foldr1 (UI.unionWith const) . map makeClick
      where
        makeClick (element, cmd) = UI.pure cmd <@ UI.click element
We’ll walk through this code from top to bottom.
First buttonMap is defined as an associative list mapping all calculator buttons to their respective Commands.
Next we define clicks :: Event Command. Where Event a represents a stream of events as they occur in time.
This clicks event stream is generated by applying buttonClicks to the button map we created in the first step.
So effectively each time a calculator button is clicked we receive the Command represented by the button.
In the next step we use processCommand to generate calculator state transition functions based on each command in the stream.
commands = fmap processCommand clicksWe have to use fmap to access the command in the Event container.
The resulting type of commands is thus commands :: Event (State -> State).
Now effectively commands is a stream of (State -> State) calculator state transitions.
In the following step we define a Behaviour based on the commands stream of state transitions.
In Threepenny Behavior a represents a value that varies in time. Think of it as
type Behavior a = Time -> aThe Threepenny function accumB can be used to compute behaviour starting from an initial state and a stream of state transition events:
accumB :: MonadIO m => a --^ the initial value
       -> Event (a -> a) --^ the stream state transitions
       -> m (Behavior a) --^ the resulting Behaviour (that is a value varrying in time )
So once calcBehaviour <- accumB initialState commands did all the heavy lifting
we just have to extract the display text from the state and to render it in the outputBox:
  -- use Calc.toString to extract the display string from the calculator state
  let outText  = fmap toString calcBehaviour
  -- write outText to the outputBox UI element
  element outputBox # sink value outText
Recap: what we’ve got so far
Until now we have written a calculator as a Threepenny GUI application. We can build and execute it with the following stack commands:
stack init
stack install
stack exec ThreepennyElectron 8023
If you now navigate your WebBrowser to http://127.0.0.1:8023 you’ll see the calculator in action.
To ease the usage of this basic Threepenny application when working in GHCi I have provided a short helper function up which will automatically
open the Threepenny application in your default web browser:
-- | launch application in default web browser
up :: IO ()
up = do
  let port = 8023
  launchAppInBrowser port
  start port

-- | convenience function that opens the 3penny UI in the default web browser
launchAppInBrowser:: Int -> IO (Maybe Handle, Maybe Handle, Maybe Handle, ProcessHandle)
launchAppInBrowser port = case os of
  "mingw32" -> createProcess  (shell $ "start "    ++ url)
  "darwin"  -> createProcess  (shell $ "open "     ++ url)
  _         -> createProcess  (shell $ "xdg-open " ++ url)
  where url = "http://localhost:" ++ show port
Electron Integration
So now we are able to execute our calculator as a local web application in our web browser. But our aim was to have a local standalone application that does not rely on a browser.
That’s where we bring in Electron to bundle the Threepenny GUI Haskell backend with a Chromium based fronted.
Providing a very straightforward wrapper script
Electron is a popular JavaScript framework that allows to write cross platform desktop applications based on Chromium. Real world applications like Atom, Visual Studio Code or Slack are good examples of what can be achieved with it.
As I already mentioned in the introduction, Heinrich Apfelmus already created a tutorial on how to write an electron wrapper around a Threepenny GUI application.
Let’s start with a short look at the Javascript code in.
This script detects a free tcp/ip port on localhost and spawns the ThreepennyElectron applications as a separate processes. The free port is handed over to the ThreepennyELectron app as a commandline parameter.
Once the ThreepennyElectron server is accepting connections we can safely open the application window and load the local url as it’s content.
// Relative path to the Threepenny binary.
const relBin = './build/ThreepennyElectron';

// Assign a random port to run on.
freeport((err, port) => {
  if (err) throw err;

  const url = `http://localhost:${port}`;
  let child = null; // the Threepenny Server process we will spawn

  // Keep a global reference of the window object, if we don't, the window will
  // be closed automatically when the JavaScript object is garbage collected.
  let win;

  // Called when Electron has finished initialization and is ready to create
  // browser windows. Some APIs can only be used after this event occurs. We
  // start the child process and wait before loading the web page.
  app.on('ready', () => {
    child = spawn(path.join(__dirname, relBin), [port]);
    child.stdout.setEncoding('utf8');
    child.stderr.setEncoding('utf8');
    child.stdout.on('data', console.log);
    child.stderr.on('data', console.log);
    child.on('close', code =>
      console.log(`Threepenny app exited with code ${code}`));

    // Wait until the Threepenny server is ready for connections.
    waitOn({ resources: [url], timeout }, (err_) => {
      if (err_) throw err_;
      createWindow();
    });
  });

  function createWindow() {
      // Create the browser window.
      win = new BrowserWindow({
          width: 470,
          height: 370,
          maximizable: false,
          resizable: false,
          icon: 'calc.ico',
          title: '3PennyCalc...'
      });

      win.removeMenu();
      console.log(`Loading URL: ${url}`);
      win.loadURL(url);

      // Emitted when the window is closed.
      win.on('closed', () => {
          // Dereference the window object for garbage collection.
          win = null;
      });
  }

});
NPM handling
To make things easier to handle I’ve improved the npm integration a bit. Once you have initialized stack with stack init you can build and run the calculator app (including the haskell backend) with just two npm commands:
npm install
npm start
The trick was to define a prestart script in package.json
"prestart": "node ./stack-install.js",This script simply does a stack install --local-bin-path build. This guarantees that the ThreepennyElectron binary is residing under ./build/ThreepennyElectron as expected by the main.js script.
With the following npm command you can create application package ready for deployment on your platform:
npm run pack-appYou can use the parameters --platform and --arch to create packages for other platforms as well.